How to Install Debian 9 Stretch?
There are many good distributions in the GNU/LINUX world, but if we want a “universal” one, I think we should talk about Debian. Debian is a distribution with a phenomenal track record with stability as its main focus but also its universality, Debian can be used in production servers as it is a small home PC. In this guide I will help you install Debian 9 Stretch from the beginning.
Downloading Debian
To install Debian 9 Stretch, first we need to access the download section of the Debian website, and first choose how we want to download it.
There are multiple options to download the debian package. You can choose whatever is easiest for you. I almost always choose the method of downloading via Torrent because it is faster and helps not saturate the main distribution servers. I recommend this method. To download via Torrent, I recommend Deluge or Qbittorrent.
After that, we choose cd (smaller size and smaller packets included) or DVD (large size and more packets) and the processor architecture that is usually 64-bit. And finally burn it to a DVD or USB drive.
Install Debian 9 Stretch
Note: I always have to tell people that before they install a new operating system, try installing it on a virtual machine. This in order to minimize errors and loss of information. Once you are familiar with the process and satisfied with the result, you proceed to install it on the “real” computer.
Let’s install Debian 9 Stretch on our machine. This is the first image that Debian displays when you enter the installer. We choose Graphical install and press Enter as shown in below image. After that, we chose the language and our localization.

Once you choose graphical install from above image, you will get below image to select your preferred language. Here, i have chosen English as my language. You can go with your language.

Once you click on continue button after selecting the language, you will be getting next window to choose your time zone location . Here, choose your the location for which you want to display the server time. I have chosen united states time zone for myself.

Once you click on continue button of above image, next step will come to choose our “locals”. That is, the system’s regional configuration. After that we must choose the input language.

I have selected United States as locales and clicked on continue button to proceed. Now we have to choose keyboard language configuration (input language configuration). Here i have selected English.

Once you press continue button, the installer will start writing the changes that you have selected or entered during above steps. You can see this in below screenshot.

Once above changes will be set then next thing you’ll see about network configuration. We will enter the hostname and then the domain name. I have entered debian as hostname of this system. You can write your hostname as per your naming convention.

Next we need to type the domain of the system. Enter full domain name in which your server is hosted.

Once you will click at continue button, next window will come to set the root password. Enter the root password in below image.

Now it follows user creation and new user password creation. Set up a user and password in next windows. Enter the full name of your username in below image and click at continue button.

Now type your username that will be used to login to this server. I entered my first name as my username.

Once you will click at continue button after setting the username, next screen will come to set its password.

Then comes the delicate part of installing any operating system: Disk Partitioning. We can choose the option we like, but I like to have control of what partitioned so I choose manual.

In this window appears the hard disk of our computer, create a virtual disk from 0 and does not even have partitions but do not worry, see how it is done. Select the disc and click to continue.

As the disk is “new” it warns me that there is no partition table, but the installer offers to create it. We say yes.

Once you will press continue, below screen will come to proceed.
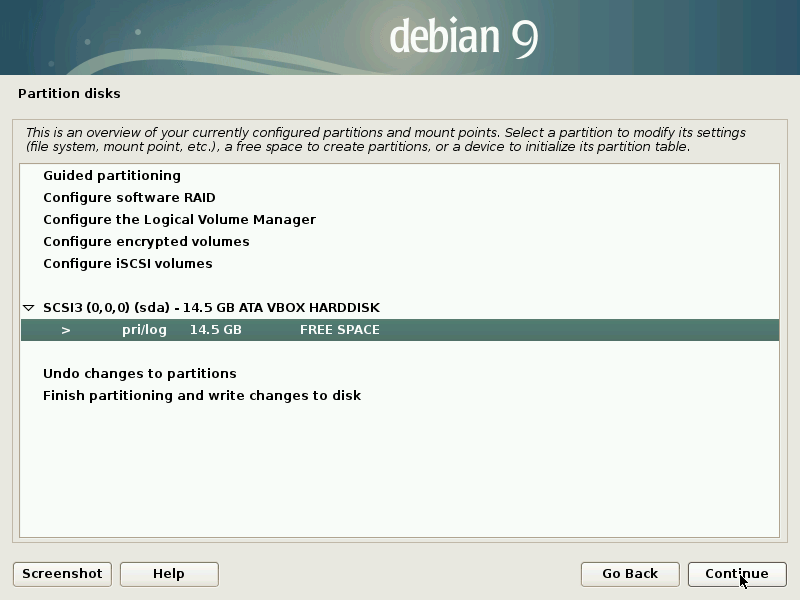
At this point we can create the first partition that we will use for the system as such. Select the free space and click on continue. And then we enter the size. Debian also recommends a swap partition so we put a smaller size than the total.

Now we will allocate the size to this disk.

In the following windows we placed that the partition will be primary and created at the beginning of the free space.

Choose location of this new partition using below window.

After that, we must modify the file system type (Ext4) and the mounting point (/) and leave it as it is in the image. Select that we have finished defining partition and click on continue.

Then start creating the swap partition with the remaining disk space. Select the remaining free space and click on continue.

We then tell the installer that we want to create a new partition but this time it will be logical.


And in this step is where we define that it will be swap partition.


We say that we have finished defining the partition and click Continue to see the summary of the partition.


This way, a simple and basic partitioning in GNU/LINUX must remain: one partition for / and another for Swap. If you are installing this installation on a main computer and “real” and the hard disk must already be partitioned and what you should do is simply say where you want to install the system. Now we say that we have finished partitioning the disk and click Continue for the installer to make the changes.


After that Debian will ask us if we want to analyze another DVD, if we want to use a replica of beef and if we want to participate in an anonymous packet usage survey. In this tutorial, we use the DVD so to all questions I will answer NO.


Configure Popularity Contest.

And we come to the step of selecting the software to install. This is how it looks by default.

The software you choose will depend on you and your needs, for example for a production server you should not install graphical environment. There would be something like that.

In this case, I will choose MATE as my desktop environment. Once you have finished the installation process of the chosen software, you will ask us if we want to install the Boot Loader.

We say yes, and he’ll ask us where we want to be. Select your hard drive and click on continue.

After that we should see the window where the installation is finished and we can relocate the computer to use our brand-new Debian 9 Stretch.

Now your Debian 9 Stretch has been installed on your server. I hope you like this article. Please follow our Facebook page and Twitter handle to get latest updates.
Read More:

- How to Use CAT Command on Linux System? - April 24, 2018
- How to Install Zabbix on Ubuntu Server 16.04? - March 29, 2018
- 11 Examples of ls Command to List Files in Linux - March 20, 2018